
Being prepared once your animal is on the ground is a huge step to ensuring a quality mount. Here are a few tips and instructions on getting your animal from the field to the taxidermist in proper conditions.
Need to Know
I always suggest bringing quality paper towels and a camera on any hunting trip.
You have just taken the specimen you worked so hard to get, now what?
- keep your specimen as clean as possible and wipe away any dirt, blood or fluids.
- take lots of pictures from different angles. I suggest trying to get the antlers above skyline and taking the picture from ground level up. These will be great reference for later and an incredible keepsake.
- try not drag the animal as this can cause hair damage.
- never cut up the front of the neck or throat area. It’s better to skin larger animals right away and keep them cool and dry. With smaller animals, you can freeze them whole.
Shoulder Mounts
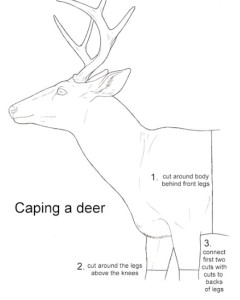
- cut around the body, well behind the front legs, making sure you have the brisket/belly area in one piece.
- 10 inches below the armpit area, cut around the front legs
- follow the hairline from your circle cut up into the armpit area
- cut straight back from the armpit area to your original cut around the body
- tube up towards the skull and sever from the carcass
- bring to the taxidermist or freeze right away
Lifesize Mounts

- make the proper incisions as shown on diagram and keep cuts straight
- remove the skin from carcass, severing the legs from the feet, ankles or wrists
- work skin off the body and remove the skull from the carcass, leaving the skull in the hide
- fold skin to skin, roll up and place in a strong plastic bag
- bring to your taxidermist or freeze right away
With any specimen if you are unsure of the proper steps, get it to the taxidermist as soon as possible or freeze it.